JavaScript seems to be disabled in your browser. For the best experience on our site, be sure to turn on Javascript in your browser.
Build S.170.2, built around the Fox Performance suspension range and the super–rugged Sram GX drivetrain.
This bike is available to buy through the cycle-to-work scheme
£5,699.00
*UK prices include VAT, Euro excludes duty and tax. Shipping charged at checkout
*UK prices include VAT, Euro and USD exclude duty and tax. Shipping charged at checkout
Enter your measurements in mm below.
Shoes on and fingertip to fingertip as shown on the diagram; you’ll find it easier if you can find someone to hold the tape.
Need help with how to measure yourself accurately - Click here
By generating your perfect size you are agreeing to being added to our mailing lists to receive sales and marketing communications. See our privacy policy here. See our terms and conditions here.
Your measurements are a close match to one of our extended range of sizes. We recommend you ride a
Compare against a full custom option below.
Your measurements are best suited to our full custom option.
Compare with standard sizes below.
*Additional £650 to build cost
If the table shows * then this size does not allow a dropper post to be run for your inseam length, please contact us for further information
We’ve chosen an air shock for weight-saving and ultimate levels of adjustability. We’ve known and loved the guys at Fox for a long time and we trust them implicitly. The Performance range is a more affordable and durable way for riders to experience that level of expertise. Designed as a mullet, the S.170 can also be run with 27.5 upfront and 26 on the rear.
Book a Demo >
Book a Consultation >
Call Now >
Email Us >
Book a Demo
** Please note - some images have alternative specifications and do not reflect the factory builds.
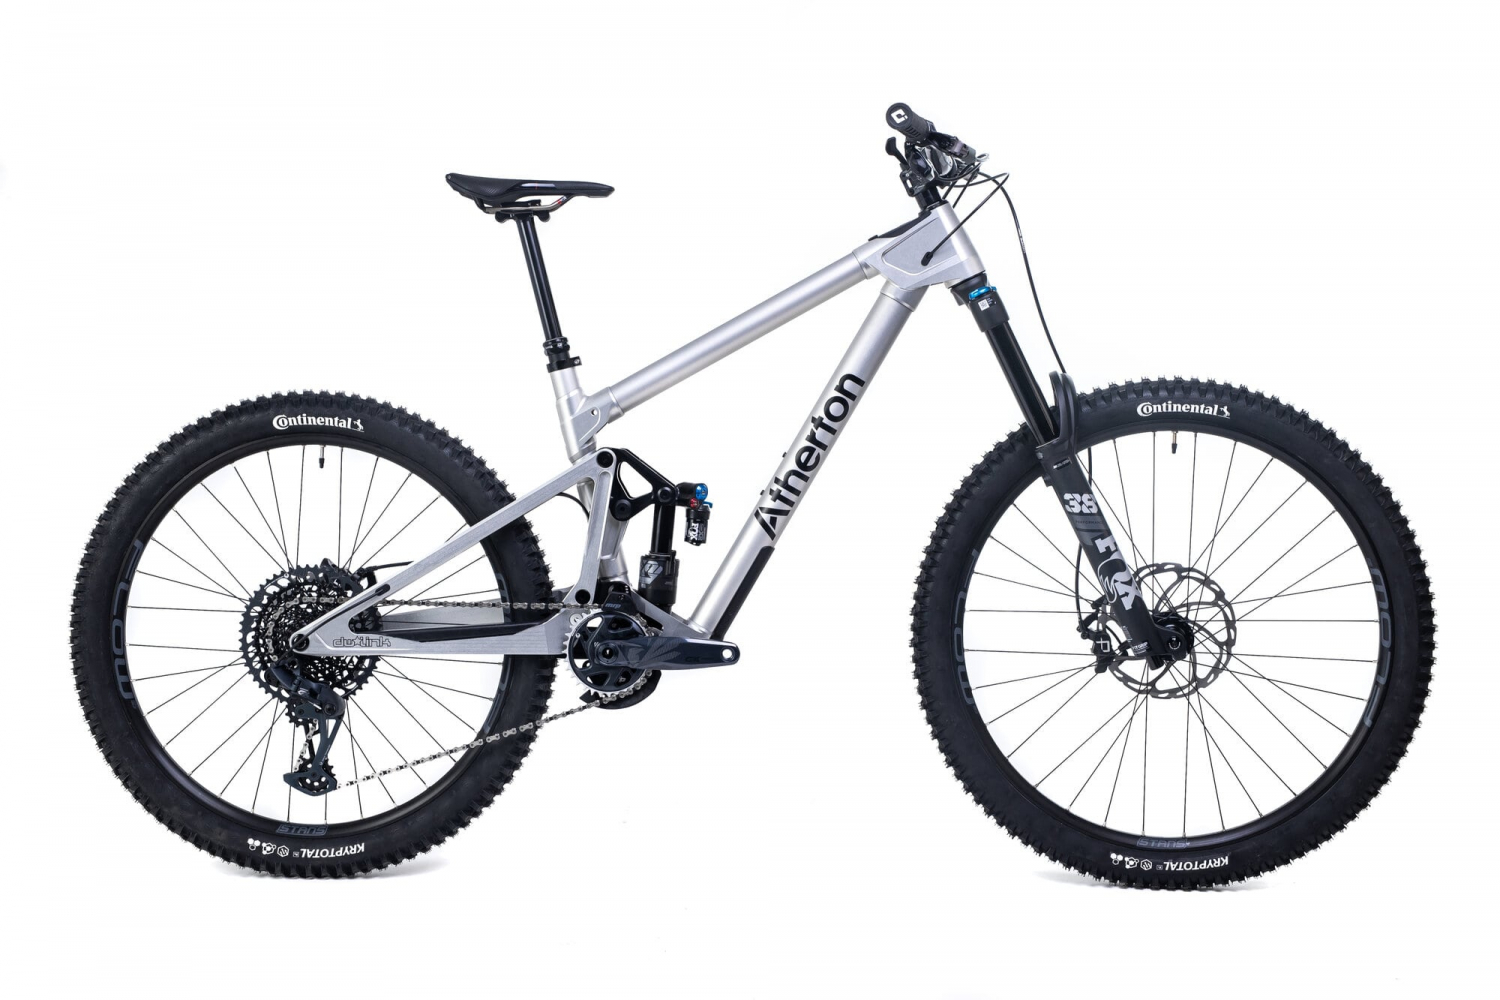
FRAME
Atherton S.170
FORK
Fox 38 Performance 180mm
SADDLE
SHOCK
Prologo Nembo 145mm Cromo
Fox Float X2 Performance
BOTTOM BRACKET
SRAM DUB 73mm Threaded
CHAIN
SRAM Eagle
CRANKSET
SRAM Eagle 70 165mm 32t
SHIFTER
SRAM Eagle 70
CASSETTE
SRAM Eagle 70 10-52
REAR DERAILLEUR
HEADSET
FSA Trail
STEM
FSA Gradient 35x35
GRIPS
ODI Flow
DISC BRAKE
Hayes Dominion A4
BRAKE ROTOR
WHEELSET
Stans Flow S2 e-Sync (29” | 27.5”)
TYRES
Continental Krypototal Enduro 2.4
Using lug and tube construction means that our new S-range can incorporate all the learnings from our award-winning A-range so expect perfect-fit, super-strong bikes with high-performance and playful ride characteristics guaranteed. You’ll find the geometry remarkably similar (we all love it so why change?!) but for the S-range, rather than print our lugs in titanium they are created in 7000 series aluminium using CNC machining.
See More
UK Patent Application Number GB2400886.4
We believe that our fit calculator will guide you to your perfect Atherton Bike. If you want more information, a full geometry chart can be found in our Tech Sheets.
See our Tech Sheets here
All of our sales are through this website. Before you select your bike first add your measurements to our fit calculator to help select the perfect size for you.
If you have any questions during the process there are lots of contact links built into the pages or email sales@athertonbikes.com
For our S-Range estimated delivery dates will vary by size and by selected build – especially in the early months as we scale up our production. Add your preferred options to the basket for the most accurate estimate of the delivery date.
Yes, we offer frequent open days and a collect-in-person option. It might also be possible to visit by appointment – just drop us a line so we can put something on the calendar.
Dyfi Bike Park is just a five-minute pedal away so it’s a great spot for a demo or your first ride on your new Atherton Bike.
Delivery costs vary by location, you’ll see shipping fees applied at checkout. You are welcome to collect your bike or ask us about organising your preferred courier.
We're proud to serve customers worldwide, with over 66% of our customers enjoying our bikes from outside the UK.
The prices you see on the website in Euros or USD exclude GBP VAT but you may be liable for sales tax locally.
Import duties also vary with some countries including the European Union, Australia and Canada waiving import duties entirely for goods with a UK certificate of origin (including all Atherton Bikes).
For specific details, we recommend checking with your local tax office.
If you're located outside the UK and wish to collect your order from our headquarters, please be aware that you will be required to pay UK VAT. You should be able to reclaim this VAT at your port of export.
We accept payment through PayPal and all major banks.
You can pay in Euros, USD or GBP. We are members of both CycleScheme and Green Commute Initiative with no max or minimum spend.
All orders must be placed through the website, with the full amount paid at checkout to join the build queue. We do not take deposits for S Range Bikes.
We ship your new bike as close to completion as possible, but some minor assembly will be required. You’ll need to fit the front wheel, align the handlebars, inflate the tyres, fit your favourite pedals and you’re good to go!
Unfortunately, we are not able to offer the same level of customisation on the S170 as we do on our A-series bikes so cannot offer a choice of shock with the S170 frame. It comes complete with a Fox DHX2 coil shock, and exactly the right spring to suit you.
The S170 was designed to use a single crown 180mm travel fork, like a Fox 38 or RockShox Zeb. Any single crown fork from 170mm to 190mm travel will work great - contact us if you'd like to discuss how different travel affect geometry.
Dual crowns forks are fine to use too - as long as the axle to crown measurement is no more than 603mm. This means Fox 40 and RockShox Boxxer are no problem. If you're not sure which fork to run, drop us a line on sales@athertonbikes.com and we'll be happy to help!
We understand that everyone’s needs are different, and our suggested size might not be what you expect. We’d be happy to discuss this with you, just drop us a line: sales@athertonbikes.com
Of course! We are proud to offer a lifetime warranty.
We will update you on all key points of the manufacturing process or mail us at any time at sales@athertonbikes.com
Build 3, our most accessible S-range build, features a Rockshox Deluxe Coil Select, Rockshox Domain R fork and a mixed Sram drivetrain.
SEE MORE
Our flagship S-range build, features a Rockshox Vivid Ultimate Coil, Rockshox Zeb Ultimate and a mixed Sram drivetrain with X01 upgrades.